Card Making

2016 Christmas Cards: Merry & Bright

I just love this time of year, the smell of the Christmas tree, listening to nothing but Christmas music, and the feeling of jealousy of the people attending Ellen’s Twelve Days of Giveaways. Ahh… I just love it!  And of course the rush to get Christmas cards made and sent, because we all know I like to wait until the last minute to do anything. It’s been a good while since I made a card but I really wanted to make Christmas cards this year. I made some last year but because we started packing our house up, they quickly fell to the bottom of my to-do list. Hopefully I get around to posting about those soon, emphasis on “hopefully”.

merry-bright-5

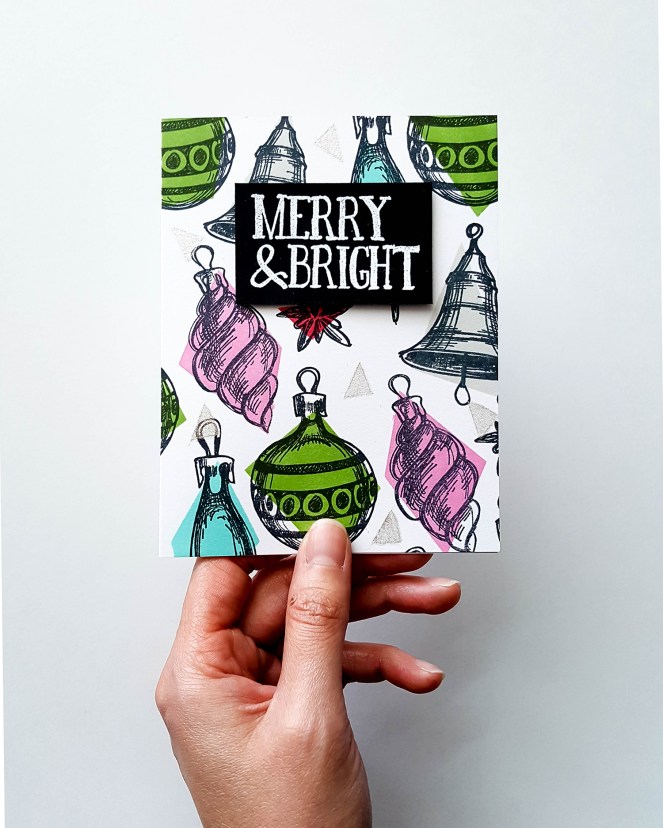
This year I decided to use the Festive Sketch stamp set from the Tim Holtz Collection. I stamped a pattern of ornaments all over the front with my MISTI. Aligning the stamps like the photo below helped me stamp my cards very quickly.

merry-bright-4

I used Post It tape to make some funky shapes over the ornaments and colored them in using my blending foam tool and some Papertrey Ink. The colors I decided to use are Soft Stone, Hibiscus Burst, New Leaf, Hawaiian Shores, and Pure Poppy. I love this color combo now but I was very hesitant at first because I am not a big fan of pink (but I love flamingos and pink lipstick?). If it were up to me, all my cards and layouts would be black and white, BUT I’m very happy with the pops of colors on this card.

I did the same thing, but in smaller triangles, with a Wink of Stella brush in clear.

20161204_150147

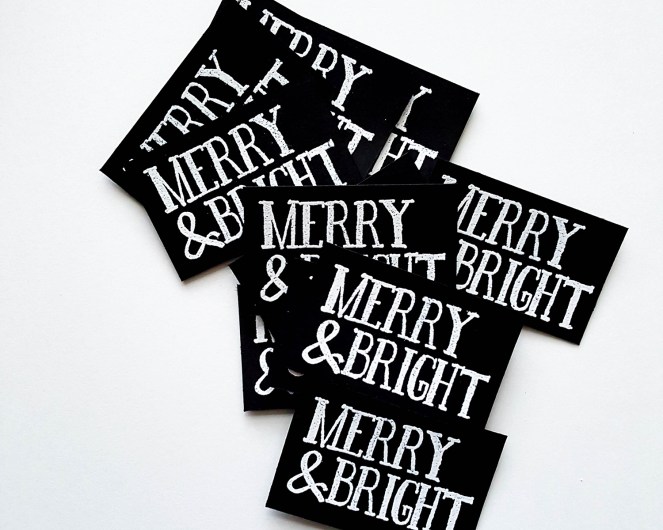
For my sentiment, I used PTI True Black paper, SSS white embossing ink, and Versamark Watermark Stamp Pad. It’s been such a long time that I’ve embossed anything, it warmed my heart and almost burned my fingers.

I adhered the sentiments with Scotch Permanent Mounting Squares.

merry-bright-1

The inside of my card was stamped using Memento Tuxedo Black and my Martha Stewart clear stamp mount.

merry-bright-2

This card was VERY simple to make, just how I like it! I made a total of fifteen cards and now all I have to do is get them in the mail, which I WILL DO this week!

merry-bright-3

Love, love, love this year’s Christmas cards and I hope you do to!

On a side note, I decided to partake in the December Daily festivities and I cannot wait to show you what I’ve done so far!

Stamps Used: Tim Holtz Festive Sketch

Supplies Used: Martha Stewart Stamp Mount, MISTI, Ranger Blending Tool, SSS White Embossing Powder, Wink of Stella Clear Marker, Versamark Watermark Ink Pad

Paper Used: PTI True Black, PTI White Card Set

Ink Used: PTI Pure Poppy, PTI Hawaiian Shores, PTI New Leaf, PTI Hibiscus Burst, PTI Soft Stone, Memento Tuxedo Black

Card Making

Joyeux Anniversaire!

Bonjour everyone! Today I am sharing a new card I made for a friend. She wanted to give this card to her grandmother for her 96th birthday. I decided to do some watercoloring for this card because I had so much fun with my Halloween cards, but I wanted to try a difference technique.

My friend wanted the card to say “Happy Birthday” in french along with her name. I thought this might be a little hard since I don’t own any stamp sets that have french sentiments but I was able to download a pretty font and I just printed it out instead.DSC03208

I used Mama Elephant’s Freestyle Florals stamp set and made a pattern on Canson watercolor paper. I stamped the flowers and leaves with my Versamark Emboss Ink Pad and used clear embossing powder from Simon Says Stamp.
DSC03211

For the colors, I used my Peerless “Complete Edition” and “Pretty in Pink” watercolor sets.

I was very happy with how the flowers popped once I colored in the background in blue. I also love the way the watercoloring looked once it was completely dry. I highly recommend getting Peerless watercolors if watercoloring is something you’re interested in but don’t want to spend too much money on because you are a beginner.

I hope my friend’s grandmother had a great birthday and enjoyed the card and I hope you guys enjoyed it as well! Au revoir!

Items used:
Stamps: Mama Elephant Freestyle Florals
Ink: Tsukineko Versamark Emboss Ink Pad
Paper: Canson Watercolor Paper, Papertrey Ink White Card Set, Papertrey Ink Summer Sunrise Cardstock
Other: Simon Says Stamp Clear Embossing PowderPeerless Watercolors, Peerless Watercolors Pretty in PinkRanger Water Brush

Card Making

You’re My Boo

Hello again, I’m back with some Halloween cards! I know it’s been awhile but with the holidays coming up, I was ready to get back into making cards. This is actually the first time I made Halloween cards. I ordered the You’re My Boo stamp and die set from Hero Arts because I fell in love with the ghost and the sentiment.

I knew I wanted to do a watercolor background for my card, so I looked on YouTube for a good tutorial because I still need help on using my watercolors. I found this technique from Maureen Wong, which you can watch here. It was so easy to do and I love how it came out. I used my Peerless watercolors and Ranger Water Brush.
DSC03202

After the background dried, I went over little random patches with my clear Wink of Stella marker. I also used the marker to go over the ghost after I die-cut it.DSC03205

To finish it off, I tied some Tim Holtz Paper String around the card. Very fast and very simple to do!

I love how the cards came out and I’m ready to start working on my Christmas cards! See you guys next time!

Items used:
Stamps: Hero Arts You’re My Boo
Ink: Ranger Jet Black Archival Ink
Die: Hero Arts You’re My Boo
Paper: Papertrey Ink Cardstock in Royal Velvet and Orange Zest
Other: Canson Watercolor PaperPeerless WatercolorsRanger Water Brush, Clear Wink of StellaTim Holtz Paper String

Card Making

Hello Beautiful Girl

Hi everybody! I have a couple of things to share today. First, I have decided to start a monthly Project Life album. I will be blogging my layouts and I’m really excited because I love photography and journaling. I haven’t done any journaling in years but I’m ready to get back into it, plus I get to do stamping on top of that! Taking random pictures and creating stuff on Photoshop is pretty much all I have done this past week and I am eagerly trying to put everything together. I’m starting off on a monthly basis (most people do weekly) because I know I tend to get overwhelmed and impatient easily so I figured a month gives me enough time to get my pictures and layout right. Can’t wait to share!!!

And now on to the next, I’d like to share my new card!

I just recently ordered Mama Elephant’s new Charmed stamp set and i wanted to watercolor the fox. I really didn’t know what type of card I was going to try to make or if I was even going to make one, I just really wanted to practice coloring with my Peerless watercolors. So I’m pretty much going to declare it now, Peerless is my favorite coloring medium! I would’ve never thought I’d like to watercolor, and I know I still need practice, but it’s now on my permanent stash. Also, Archival Ink, where have you been all my life? Best. Black Ink. Ever. (This is where I throw my imaginary mic down. Yeah, it’s that good!)

Hello Beautiful Girl 1 Hello Beautiful Girl 2

I colored my fox and die cut it using Mama Elephant’s Sew Fancy die set, it’s so fancy, you already know. (Sorry guys, I had a lot of coffee this morning!)Hello Beautiful Girl 3

I then got the bright idea to use the Freestyle Florals set because I needed a reason to use the Lemongrass ink pad. This just happens to be the best color ever!!! I’ve been stuck on black/gray since I could first see colors and then lemongrass was introduced into my life. I’m obsessed!

I decided to try to “age” the die-cut circle with my Vintage Photo distress ink by rubbing the edge with a blending tool. Definitely need to practice that technique some more.Hello Beautiful Girl 4

I added the ribbon with the Blush ink pad and heat embossed it and the leaves. I then stamped the sentiment with my PTI Dark Chocolate Brown ink pad. I made the card base out of PTI’s Limeade Ice cardstock because it matched really well with the Lemongrass leaves and I really like that pop of color when you open the card.Hello Beautiful Girl 5I love how this card came together at the end and I think this card would be an awesome baby shower card.

I would like to end by saying this card is dedicated to the fox my friend Angela ran over this past week. I like to believe all animals go to heaven (except for sharks)! (Ha ha, I just had to give her a hard time, she was really upset because it was a total accident.)

See you guys later!

Supplies used:

Card Making

Just Saying Hello

Hello, welcome back! I have a new card to share with you today! I had a friend ask me for a card, she wanted to give it to a close friend of hers and so I finally broke out the Vintage Roses stamp set from Altenew.

Just Saying Hello 1

First let me say…. the MISTI and Vintage Roses are a match made in heaven! It would have taken me forever to stamp the roses and leaves had it not been for the MISTI. I also used it to stamp a sentiment from Altenew’s Super Scripts stamp set.

Just Saying Hello 2

I used all Papertrey Ink ink pads and paper. The sentiment was stamped with Memento Tuxedo Black and heat embossed with Judikins Iridescent Sparkle Embossing Powder.

You can see below the inks in the order I used them to stamp the roses and leaves.

Just Saying Hello 3

I decided to submit this card into the Simon Says Use Your Favorite Technique and/or Product challenge. Heat embossing is my favorite technique, especially when it’s clear or iridescent, I just love the effect it has. Also, I love any stamp set that has layers to it. I’m blown away by these types of stamps because the images are so awesome and look hand painted compared to a one layer stamp.
wed-challenge-badge_zpsf506d7ee

I hope you guys enjoyed, see you next time!

Supplies used:

Items not listed:
Cartwright Moonshine 6mm Slightly Cupped Sequins