Card Making · Paper Crafts

Smile, It’s Your Day!

Hi there! Welcome back! I can’t believe we are at the end of May already! Today is also the last day of school for the kiddos here in our part of Texas. We have been getting a lot of rain (which I love) so I decided to bring a little sunshine with my new card. I used the Simon Says Stamp kit for June for this card and I will be entering it in the Simon Says Anything Goes Challenge.

wed-challenge-badge_zpsf506d7ee

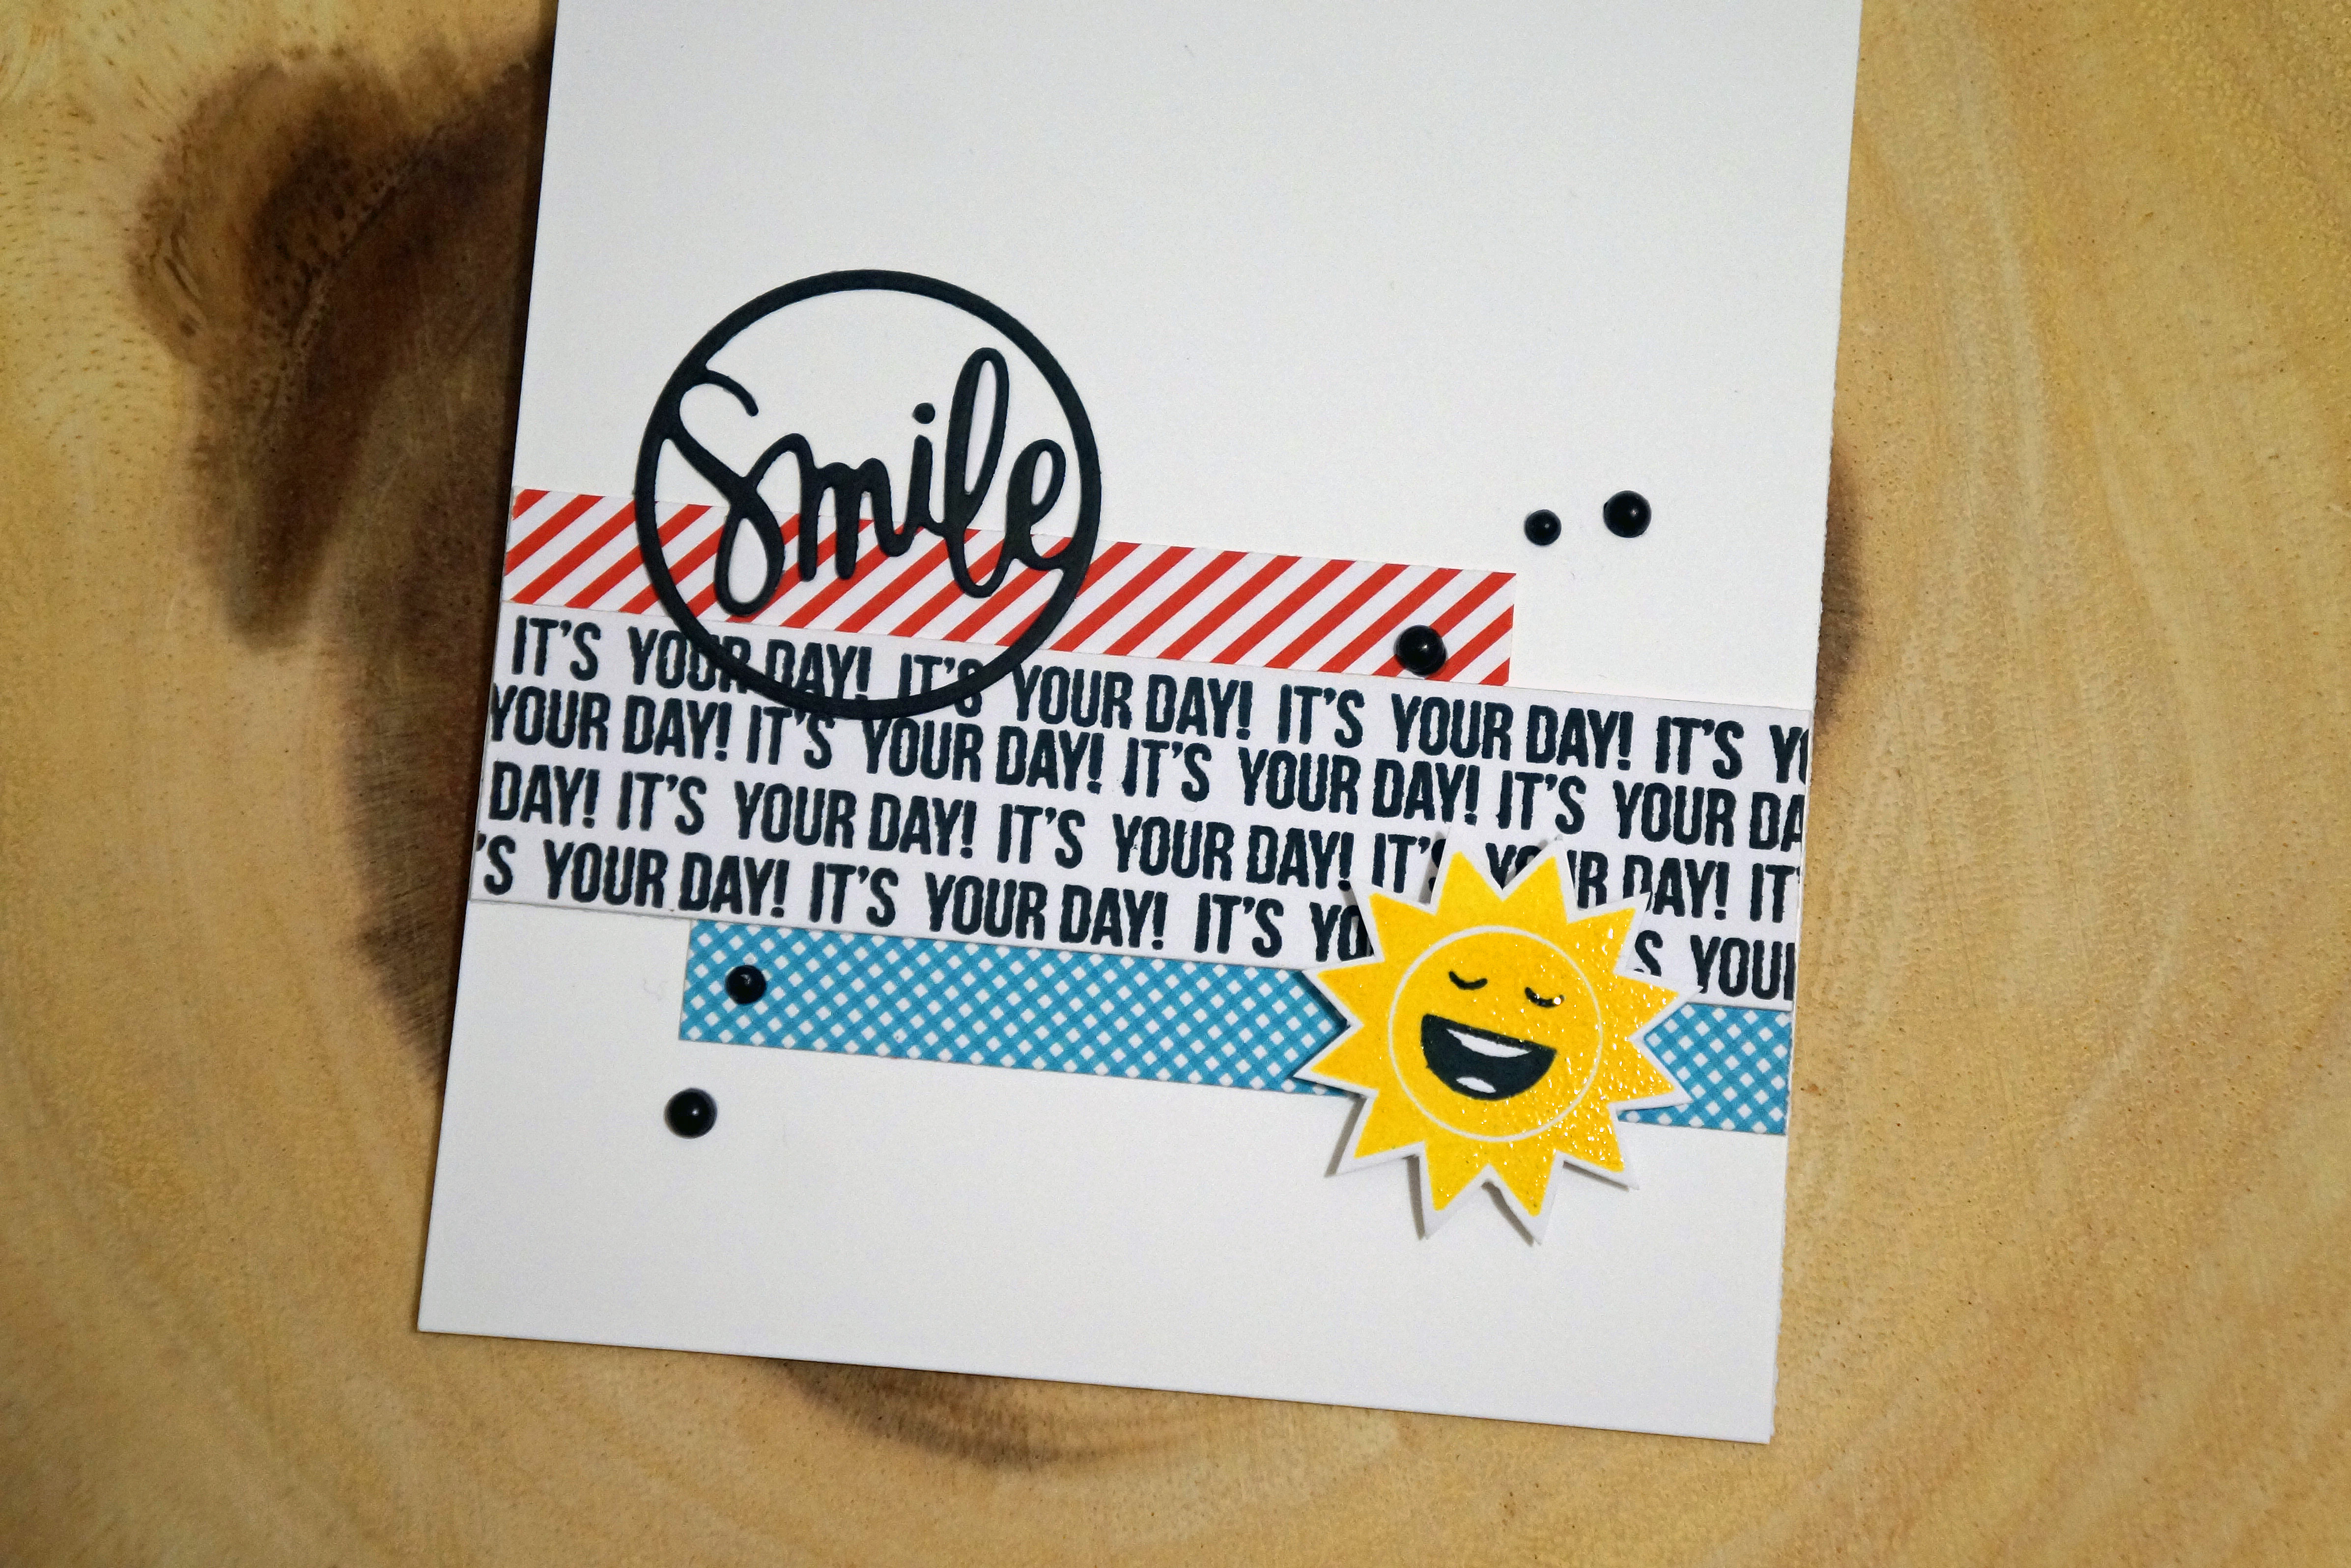
The June kit of the month is probably my most favorite out of all the kits I have received! I love the sun on the stamp set and the Smile die.
Smile, It's Your Day 3
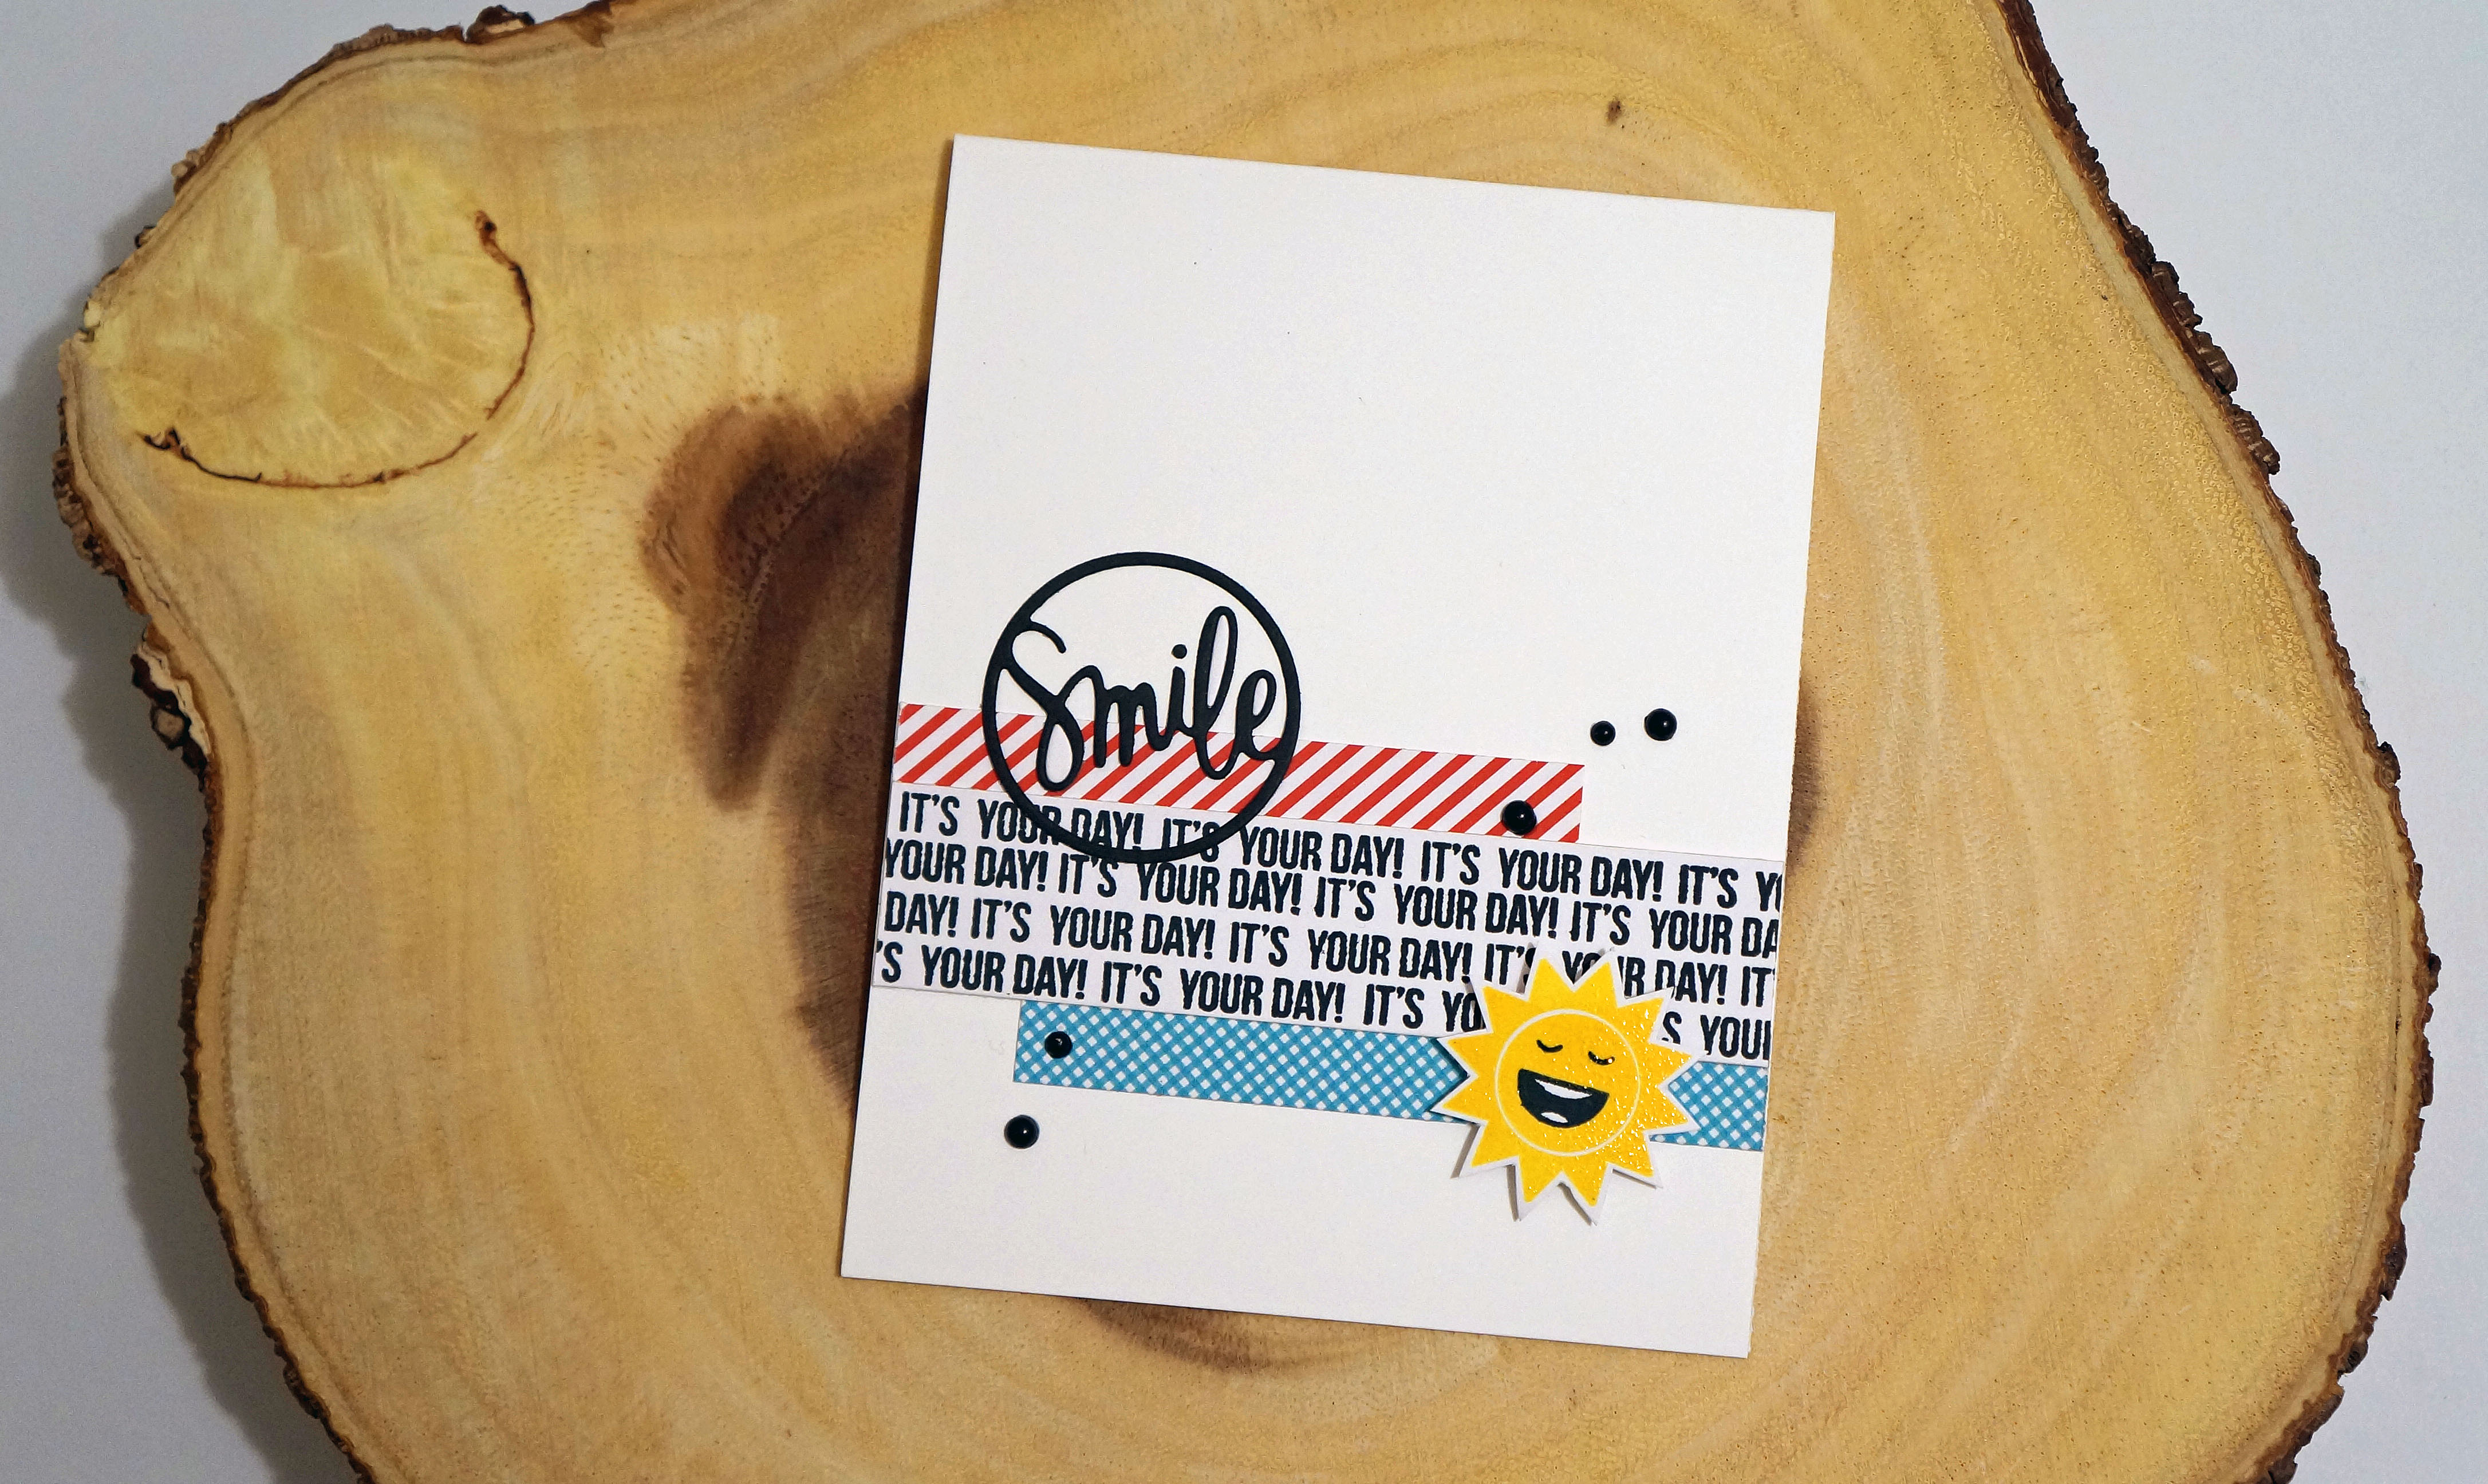
I cut small strips out of the 6×6 paper pad that came in the kit. I stamped a pattern out of the “It’s Your Day!” stamp with the MISTI. I used Mama Elephant’s Sunshine ink pad for the sun and heat embossed some Judikins Iridescent Sparkle Embossing Powder.

I wanted to add some enamel dots but unfortunately I haven’t bought any, so I used some pearl dots(?). I colored a couple with a black Copic marker to match the card. Smile, It's Your Day 1

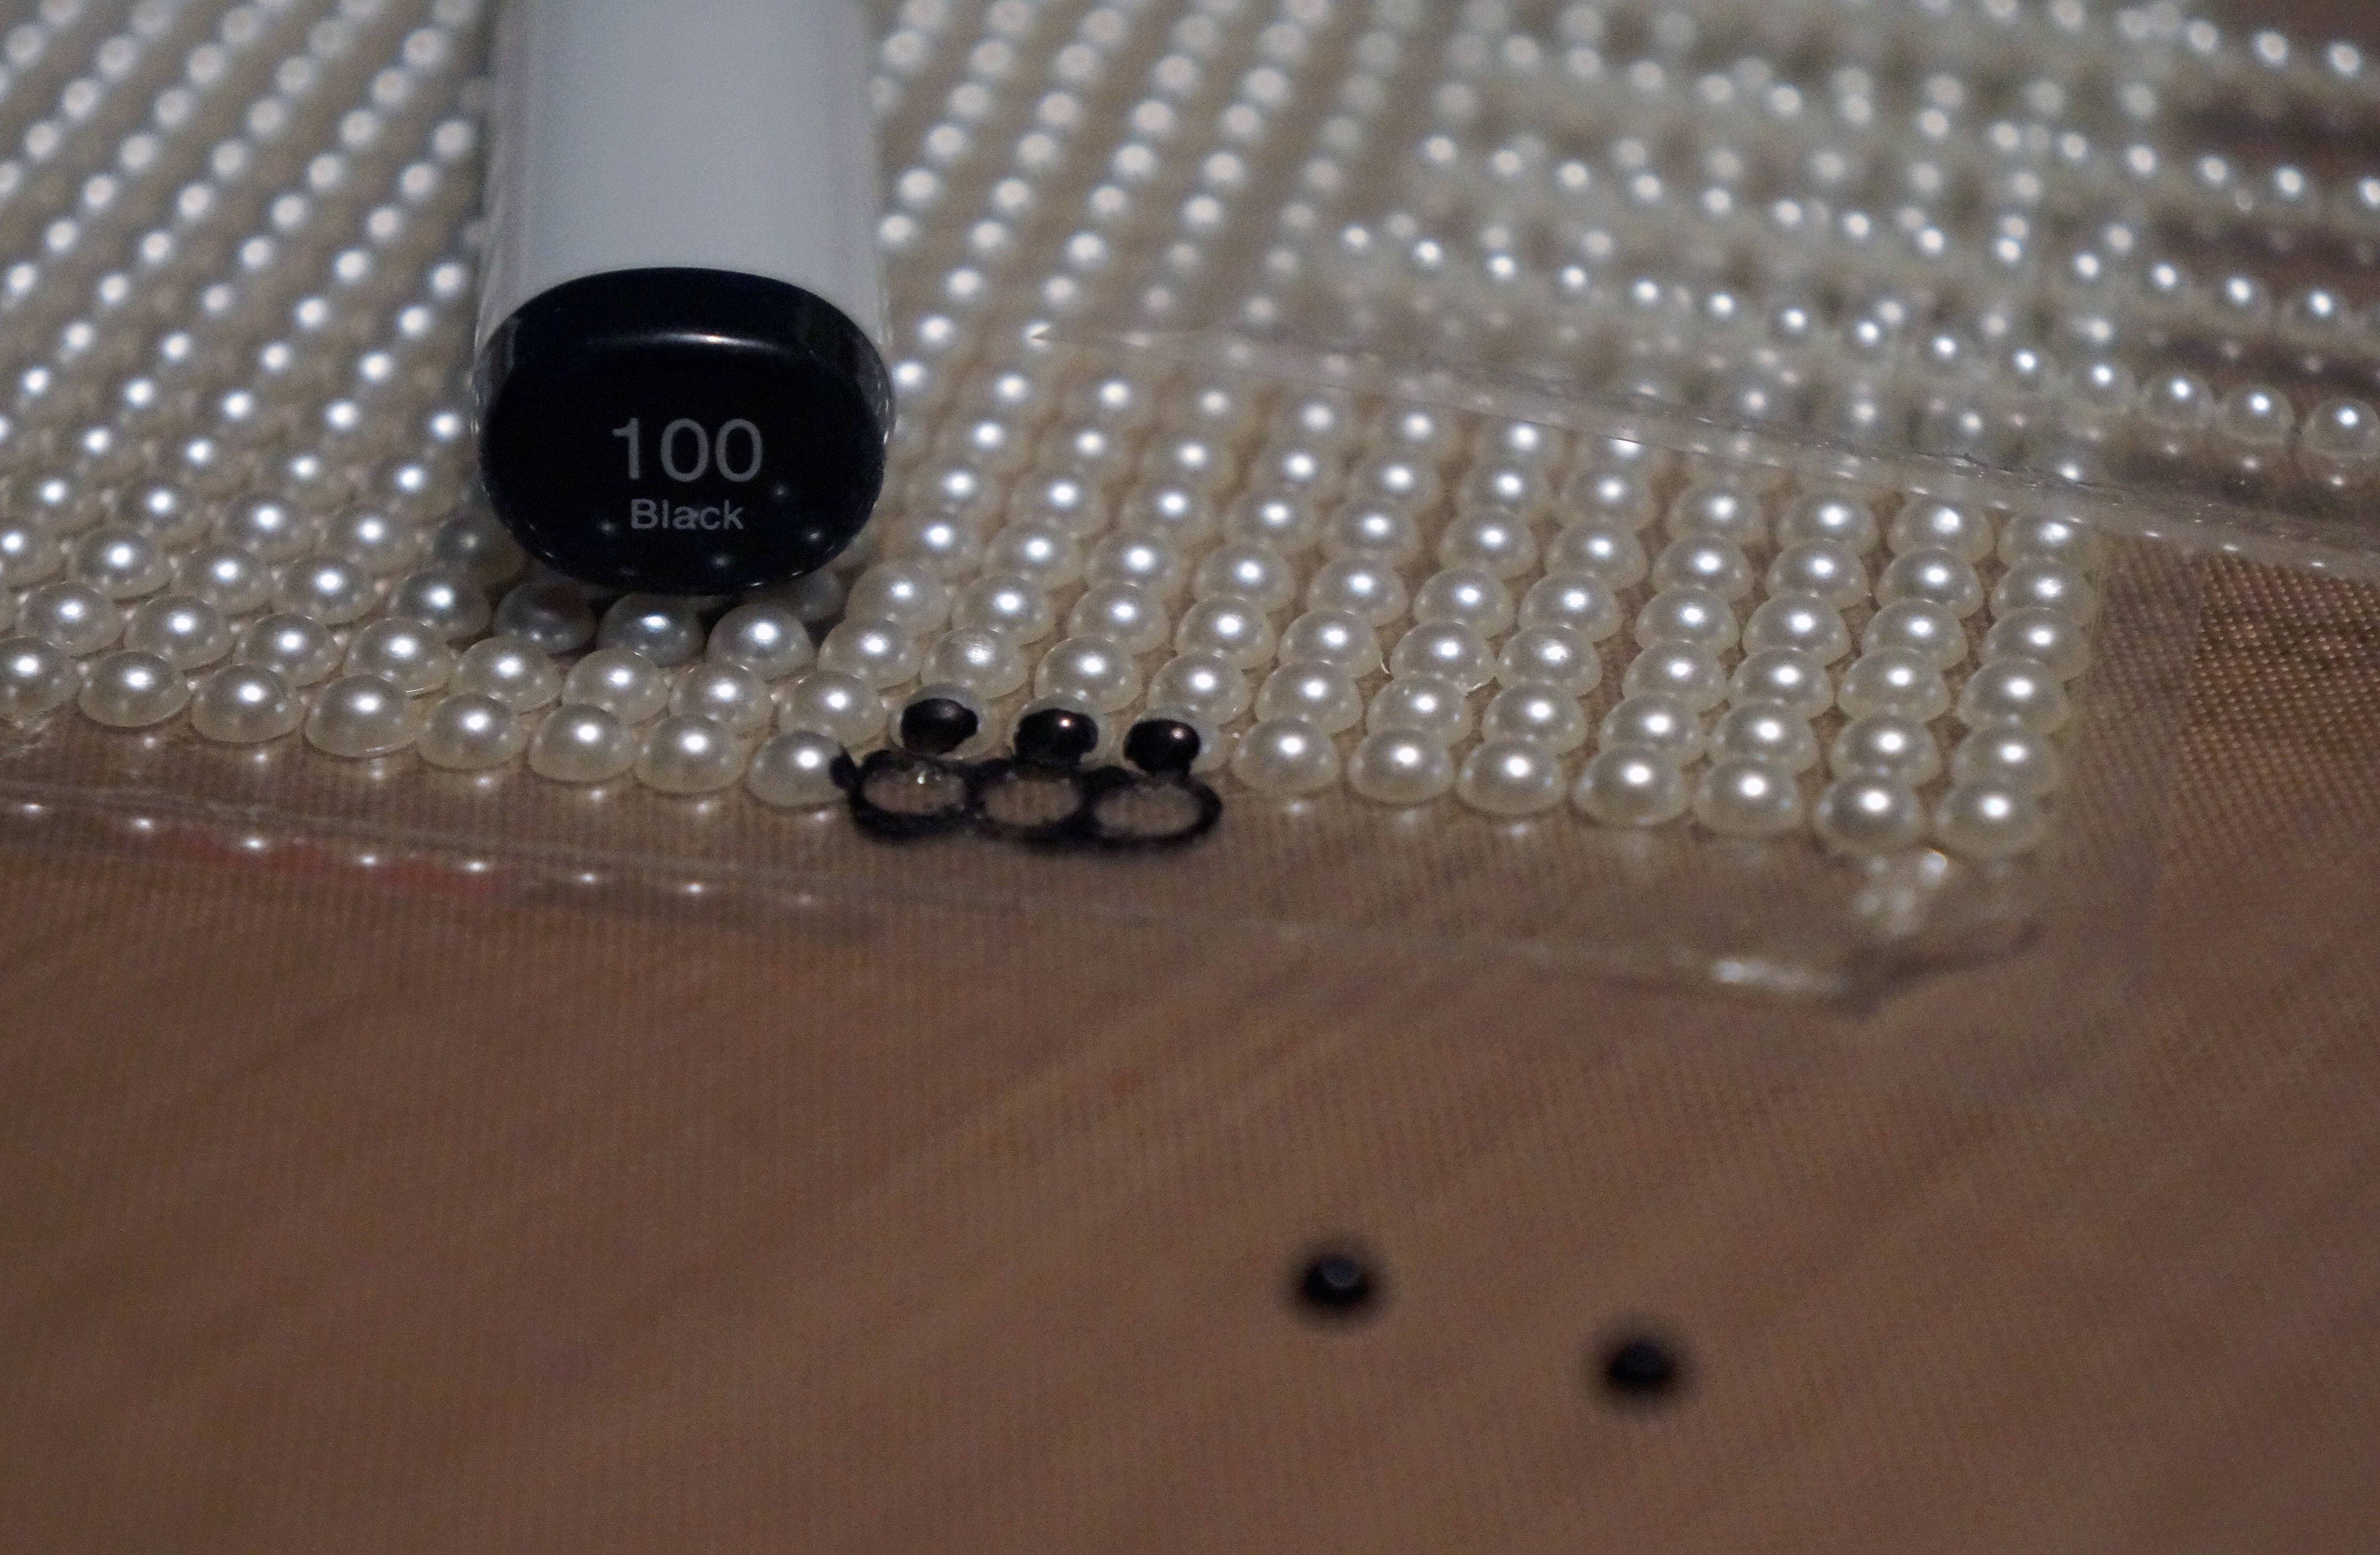
It’s hard to see the iridescent sparkle powder on the sun but it looks awesome in person. I adhered the sun with foam dots and the black pearls with Ranger Multi Medium Matte.

Smile, It's Your Day 2

Again, I love this stamp set and can’t wait to use it again! Thanks for checking out this post and I hope you have a great weekend!

Supplies Used:

Card Making · Paper Crafts · Thank You Cards

Thanks For Being So Awesome

Hi guys! I’m back with a quick post. I wanted to make a spring themed thank you card for the Paper Smooches SPARKS Anything Goes ChallengeThanks For Being So Awesome 1

I used Paper Smooches’ Uplifters stamp set and Flower dies. I used the Ranger Blending Tool and Distress Inks to create a soft background for the flowers. For the paint splotches (is that what you call it?), I used the Tim Holtz Water brush with Papertrey Ink ink pads. I cut the flowers out of Papertrey Ink Paper and glued those on top. I added some sequins to finish off the background. I cut my card stock at an angle to have the flowers popping out behind it and stamped the sentiment with Memento ink.Thanks For Being So Awesome 2

I hope you guys have an awesome weekend, I’m planning on spending time in my craft room to see what else I can come up with. Thanks for stopping by!

Supplies Used:

Additional Supplies:
Cartwright Moonshine 6mm Slightly Cupped Sequins

Card Making · Paper Crafts

#HBD

Hi everyone! Today I bring you a card set I made with only one stamp set. Happy Something is the name of this set and it is by Kal Barteski for Studio Calico. I ordered this because I thought it would be a great set to have in case I ever needed to make a quick birthday card. But when I played with the set, I couldn’t stop! I love the font and the “sketchy” look of the cupcakes and candles.

#HBD 10

The first card I made, I used masking tape to cut out the candles because I wanted to put them on top of the cupcakes.#HBD 1

I used my MISTI to stamp on this card. As you can see below, I stamped the candles first, and then put the masking tape candles I cut on top.
#HBD 2

I also used the plastic that came with my Stamp-a-ma-jig to help me align the cupcakes right where I wanted them. I learned this tip from Maureen Wong, she has many YouTube videos that show you different tips and tricks on using the MISTI.#HBD 3

Here is the finished card. The striped background paper is from the September Skies paper pack by Heidi Swapp. When I picked this paper for the background, I grabbed some Copics that matched and colored in the cupcakes.#HBD 4

I loved how the colors came out so I went ahead and used the same Copics for the rest of the set.

#HBD 5 For the next card, I just made a pattern using the four cupcake stamps and colored them in with the Copics. I stamped the sentiment on a piece of Lavender Moon paper from PaperTrey Ink. #HBD 6 For the last card, I used masking tape again to help guide me with the placement of the candles. I stamped the ends of the candle over the tape which didn’t matter because I ended up covering the ends with a piece of Smokey Shadow card stock.#HBD 7 I heat embossed the sentiment with my VersaMark Emboss Ink Pad and Simon Says Stamp Clear Embossing Powder.

#HBD 9To finish off the card, I colored in the candles with the same Copics.
#HBD 8This set is perfect to have at the office or to give as a gift. I love the fun colors, the graphics, and the sentiments. I really enjoyed making this set and I hope the recipients enjoy them just as much!#HBD 11

Supplies Used:

Card Making · Paper Crafts

I’ll Stand By You

You know you have that song stuck in your head now that you read the title of this post! Or is that just me?

How about now?

I’m back with a new card using the same dies and stamps I used on my last post. This time I decided to make a clean and simple card, which is my favorite style. I will be entering my card in two challenges. The first is Addicted to CAS Challenge, this challenge is about birds, great reason to use the flamingo dies again!  Second is the Simon Wednesday Challenge, and the theme for this challenge is “Let’s Get Sentimental”.

Addicted to CAS blog badge

wed-challenge-badge_zpsf506d7ee

First I stamped the sentiment the same way I did with my “Hope Today Tickles You Pink” card. I used my MISTI to stack the words on top of each other instead of keeping it in a straight line. You can see below how I masked off the words and stamped one word at a time. You can also see how the sentiment regularly looks (plus all the other cute sentiments that come in this set).

I'll Stand By You 2

For my card base, I used my blending tool to create a soft pink background. I used my Spun Sugar Mini Distress Ink because it’s very light and I only wanted a hint of pink coming from behind my sentiment.
I'll Stand By You 1

I die cut the flamingo with MFT paper and adhered the sentiment with foam tape.

I'll Stand By You 3

And of course, I wanted my flamingo to stand by the sentiment.
I'll Stand By You 4Also, I wanted to mention the cool background paper with the feathers is from Amy Tangerine, I will link up to that paper pack in the InLinkz below.

I hope you guys enjoyed my new take on flamingos. There’s still so much more I want to make with these guys! Thanks for stopping by!

Memory Keeping · Paper Crafts · Project Life

Florida Trip ’12

Hi guys! I’m so excited about today’s post because I FINALLY made a Project Life layout! I have been wanting to do this for the longest time. I’ve had a lot of Project Life supplies just collecting dust in my craft room and I always used the excuse of not having any pictures ready. I was determined to make something this weekend and I went ahead and used pictures from our trip to Universal Studios back in 2012.Florida Trip '12 1 I am so into gold right now, and I knew this was the album for me. It’s this beautiful solid gold and I purchased this at my local Hobby Lobby a couple of months ago. Florida Trip '12 2 I used my card-making supplies for this layout. As you can see below, I used a little Lawn Fawn, a little Mama Elephant, and more. Florida Trip '12 3 Florida Trip '12 8 The “This Way!” was stamped using Avery Elle’s Elle’s Alphas Set (no, I didn’t accidentally type “Elle’s” twice). I stamped this with Tsukineko’s Brilliance Moonlight White, which is my first time using this ink. I need to practice with it a little more, I’ve never been good at using white ink but I do have to say this dried real fast which is great. Florida Trip '12 4 I have a love/hate relationship with my handwriting… I’m left handed and my handwriting has a funny little slant to it. But it’s unique, what can I say! I found this sweet quote on Pinterest, this really applies to the trip for me personally. Florida Trip '12 5The “2012” and Florida state shape were cut out with my Cricut. The “Best Trip Ever” was written as well with the Cricut and colored in with some Copics. The gold star came with my Simon Says Stamp Kit for April ’15. Florida Trip '12 6 Florida Trip '12 7 Florida Trip '12 9 Not only was this trip the best trip ever, but also the best time of my life! My husband, son, and I had the greatest time and I hope we can take more trips like this in the future! I loved making this layout, I like playing with pictures, quotes, and of course paper and I will definitely be making more soon! Thanks for checking out The Lovely Pear!

Supplies used: